Home decor

After-Christmas Refreshment in the Kitchen

Let me be really honest – this can be a kind of blah time of the year for me.  All the festivities are over and the celebrations are completed.  The decorations come down and the world is wintery and gray.  The house can look really plain after the undecorating is completed, can’t it?

So for me, when Christmas is done and I walk into my house – particularly my kitchen, I want to smile at what I see.  I like to refresh things in my menu and my decor so it won’t be bleak looking once all the tinsel and garlands have been removed from walls and windows.

Since food is essential, I’ll start with refreshng the menu.  All the rich foods and decadent desserts are great, but now we’re always ready for something a lot more simple. If fixing dinner this week is stumping you, why not just silmplify?  Need some suggestions?

  • Baked potatoes with toppings –
    • Bacon bits
    • Chives
    • Sour Cream
    • Grated Cheddar Cheese
  • Waffles or Pancakes for Dinner
  • Quiche or Vegetable Fritatta & Tossed Salad
  • Soup Beans and Corn Bread
  • Homemade soup, made from the ham bone or chicken stock you enjoyed at Christmas.

After Christmas is over and the decorations come down is also a good time to freshen up the kitchen decor.  Your bowls and baking supplies have had lots of use and may have gotten displaced.  While putting things back into order, consider changing things around a bit.  Display pretty bowls or canisters on your counter, as seen in the pictures above (from Cottage Jounal Magazine).

1226151610.jpg

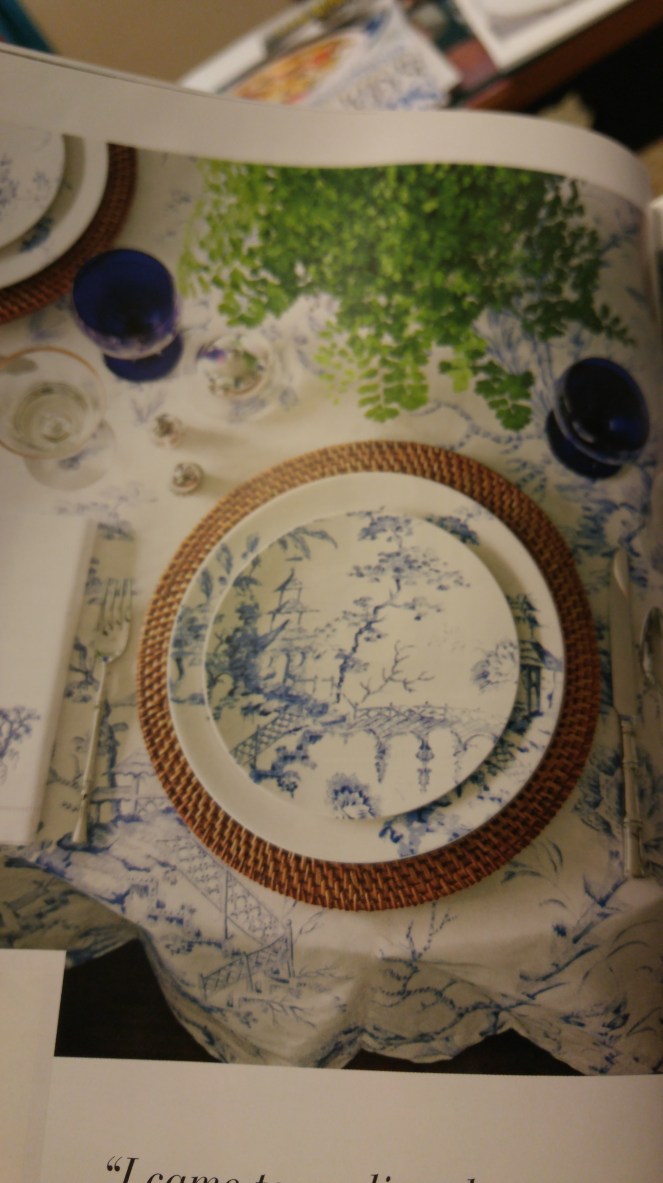
Did you  get new dishes for Christmas?  Don’t hide them!  Find a pretty way to display them in your cabinets or a way to make them really shine when you set the table.  Placemats can be changed out for pretty chargers.  They’ll add texture and color to your table.

1226151643a.jpg

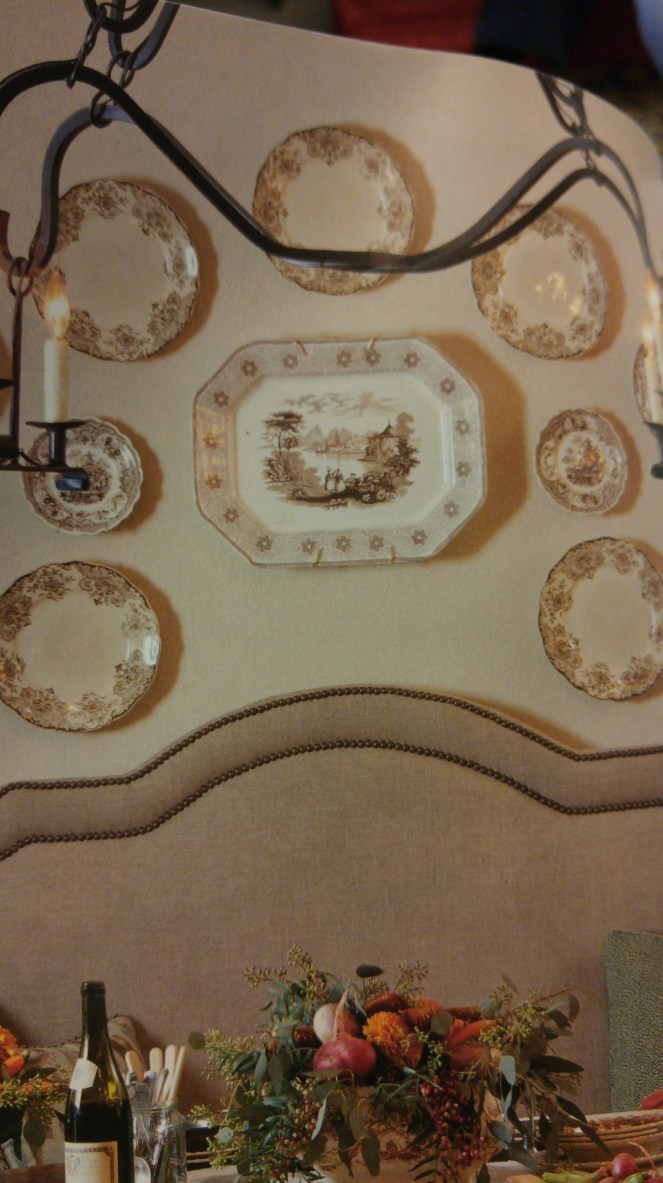
I love the plate display on the wall above, minus the wine bottle on the table :/ .    Pretty platters and special dishes would be beautiful hung on plate hangers and displayed in the kitchen or dining area.

1226151633-1.jpg

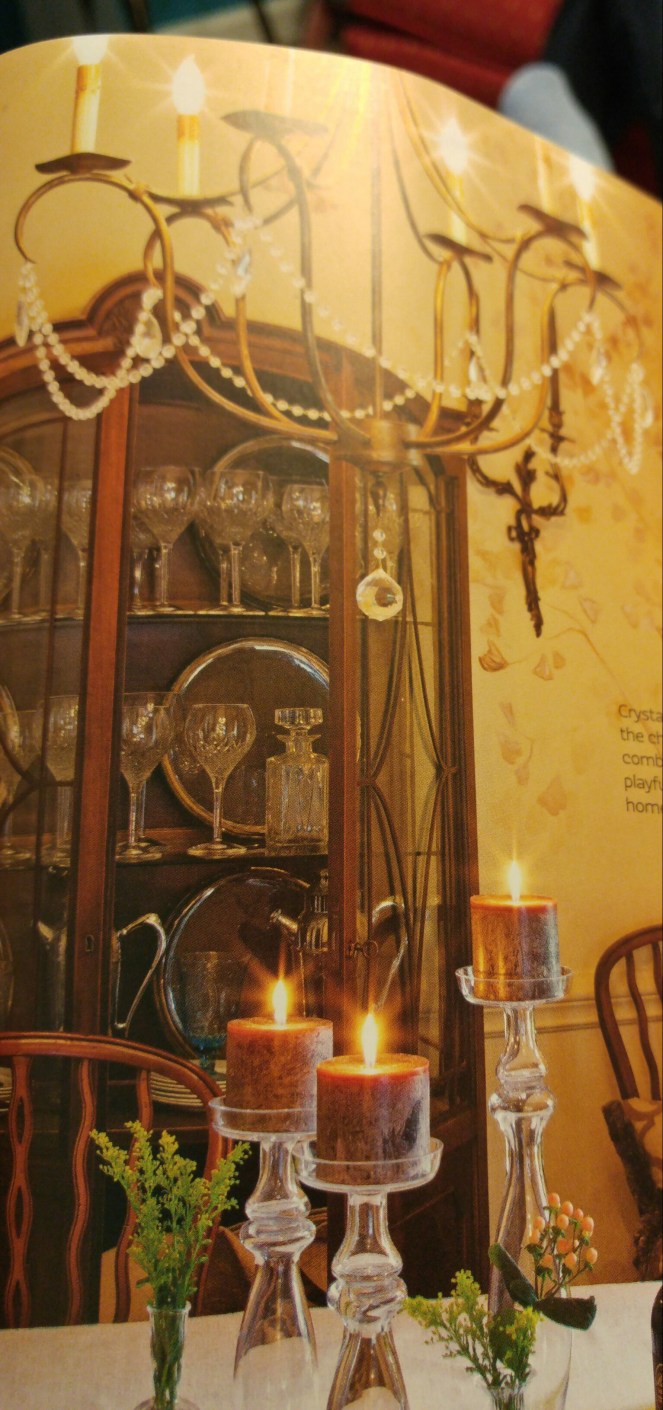
One other area of your kitchen that needs to be remembered in your attempt to refresh is your table.  With the Christmas candles gone, don’t just shirk your shoulders and sigh – find a winter candle arrangement like the one pictured above to warm up that space and invite your family and guests to gather ’round.

Another touch that I love in the above picture is the chandelier.  This is another picture from The Cottage Journal Magazine.  They added a string of beads to embellish the lighting with sparkle.  I love this touch and hope to copy it!  What the evergreen garland and white lights did at Christmas time,  the beads will do in January!

Keep your kitchen and your menu from getting the blah’s at this time of year by refreshing both with these simple ideas!

Refresh your kitchen and you’ll refresh your home!

Toodles Friends,

Home decor · Uncategorized

Adding Fragrance and Light To Your Home

When anyone walks into our homes, their senses give them a quick survey of the atmosphere.  If it’s dark, gloomy, and smells of moth balls they may turn and run! However, if there’s a warm glow with light, and it smells fragrant and fresh, they’ll feel welcome.

I told you earlier this week about my sweet friend who keeps me supplied in the latest Yankee Candle products – well, this week she brought me a tart warmer.  I love it, because its ceramic base is pretty, but it doesn’t jump out at you.  There’s a little toggle plug on it that lights up (see below) to remind you it’s on, and the tart melts inside a plastic container, so you don’t have to mess with the melted wax in order to get it out.

The scent that is burning in mine is a pumpkin something-or-other, and it smells heavenly!  No flames, or dangers that way.  I have it sitting on my desk and it fills the house with its fragrance.  I highly recommend these!

wpid-wp-1447783902678.jpg
Yankee Tart warmer

Here’s what it looks like with the melted wax.

wpid-wp-1447790623113.jpg
The tart melts into a plastic cup; no scraping the wax out!

I have told you all before that I have to have lots of light in my home.  Curtains are opened first thing in the morning, as well as the front door so  the sunshine can spill inside!

Now that it gets dark so early in the evening, I have lots of little lights burning all over the house.  I had one dark spot that was a problem, and that was my foyer.  There’s no outlet there, so I can’t plug in a lamp.  I have burned candles on my foyer table when I have guests, but I don’t want to burn one all the time.  I needed some kind of light.  THEN IT HIT ME!  LED lights that are on sale for Christmas will be perfect!

wpid-wp-1447932974903.jpg
A LED candle in my foyer

These candles are really bright.  They are what I have in the front windows of my house.  I burn them all year long to light our house up on our country road.  Whatever time you put the batteries in is when they’ll turn on each day and will burn for many hours – perfect for daylight savings time!  I love how it brightened up the foyer.

wpid-wp-1447932967671.jpg
Just the right amount of light!

If you need a light in a place where there’s no outlet, grab an LED candle now while the Christmas decor is out.  It seems they sell out quickly, so grab them while you can!  I got mine for $4 at Big Lots.

I’m a fanatic about light and smell in my home.  What’s important to you about your home?

With love,

8E63C63AC0BC189BF1C68B03C74DBB5F

Fall · Home decor · seasonal decor

Hand-Sewn Fabric Pumpkin Tutorial

fabric pumpkina

When I attended the Ladies’ retreat at Wolf Mountain camp this month, I got to participate in their fun Craft time!  Woo-Hoo!  They were making a couple crafts, one being the adorable fabric pumpkin pictured here.  It was made in about 30 minutes and was super easy to do.    I chose a paisley fabric for mine, which I thought was so cute.  A soft velour would be nice, too.  Let me walk you through the simple steps.

You’ll need:

  • A rectangular piece of fabric
  • Thread and needle
  • Twine
  • Pillow Stuffing
  • Paper bag for stem

Instructions:

  1. Turn right sides of the fabric together and stitch up the side seams.  I’ve drawn it on white paper to give you an example.  The right side is the folded edge, the left is open.
    wpid-20151022_191442.jpg
  2. Turn fabric right side out and make long basting stitch all the way around the top, leaving a long thread in which to pull and gather the top of the pumpkin closed in a minute. (You’re not sewing the two pieces shut, you’re sewing on one piece of fabric all the way around your circle, so you can gather it and stuff the inside.)
    wpid-20151022_191536.jpg
  3. Pull the thread a little to cause the fabric to gather and make an opening.  Fill the pumpkin as full as you possibly can with the filling.
  4. Pull the threads around the top to close the pumpkin.  Gather the fabric at the top and leave as little bit of the fabric on top as possible – about 1/2 inch.  Sew or tie the top closed. You could even close it with a rubberband; it will be covered.
  5. Using the paper bag, cut off a piece, about 4′ x 8-10″ and twist into pumpkin stem shape.  Using hot glue, attach to the top of the pumpkin.
    wpid-20151013_091446.jpg
  6. Take a long string of twine and starting at the top, leave about two inches, then wrap it vertically around the pumpkin to give it its shape, ending at the top.  Wrap pieces of twine around the paper stem.  Attach with hot glue, or tie off.
  7. I added extra twine around the whole stem, as you can see in the picture below. You can cut out a leaf shape from a contrasting fabric and attach it with hot glue as well.
wpid-20151015_122423.jpg
I also added little “tendrils” of twine to the top. You could add a little Spanish moss instead. Just be creative and use what you have. Raffia is another possibility.

Wouldn’t it be cute to have several sizes and coordinating fabrics?  I’ll add to my collection, I’m sure.  I hope you’ll making one of these – they’re so easy and lots of fun!

One another note – We’re having a Men’s Conference at our church starting tonight.  You can go here and see times of the services. We’d love to have your husband, sons, brothers or friends if you live in our area!  It’s going to be a wonderful time in God’s Word where men will be challenged to be mighty men of God! What woman wouldn’t want her husband to attend that?  Let’s be praying for them as they attend!

Stay refreshed,

8E63C63AC0BC189BF1C68B03C74DBB5F


Home decor · seasonal decor

Fall Favorites

Did you know that tomorrow, September 23, is the First Day of Autumn?  My daughter, Whitney has a birthday today and it often falls on the first day of fall, her favorite season!  She’s my favorite first-born.  =)  Would you pop over to her blog and wish her a happy birthday today?

As I mentioned here, I like to slowly bring the fall decor into my home.  The Lord, the Creator of the seasons, brings autumn in gradually, until one day we wake up and find that the seasons have changed.

I looked through summer’s window
and was so surprised to see,
Autumnal hues and colors
were peeking back in at me.
—Denise Cunningham

Isn’t that the way it seems? One day we look out and realize that fall has slowly enveloped us!
In honor of this new season, I’ve gone through and pulled out some of my favorite autumn decor from the past years.  Hope this inspires you a little…now that Fall is almost officially here!
I love these little pumpkins and the pop of color they give to the dining room’s turquoise.

The entryway table…

Of course, you have to add some fall touches to the outside of your porch, too!

Throw a cat in there, too, it gives an added special touch!

On the first chilly morning, we love to pull the kitchen table over to the fireplace for a cozy spot for breakfast!

Here are a few from my “old” house…

The Scrabble board set up with fall words…

Then a little twist on a fall wreath…
Find the instructions here

It seems everyone is buzzing about fall this year.  Are you on that bandwagon, or are you sad to see summer go?

Lovingly,

Crafting · Home decor

How To Add A Statement Wall for Under $5!

Pinwheel

I am blessed to have a sewing/crafting room at this Empty Nest stage of my life.  I used to do my crafting at the kitchen table.  It’s pretty great to go in my craft room and be able to leave out my projects while I’m working and not have to put it away so we can eat dinner!

I want to make this a lovely place where I’ll enjoying spending time.  I’ve been stashing away ideas on my Pinterest Board, and have been anxious to add some details to one wall in particular. It’s the longest wall in the room, and I had hung only one large-ish picture on it, but it wasn’t enough.  It really needed something else. Soooo…

On a recent trip to Hobby Lobby, I noticed that their scrapbooking paper was 50% off.  I started collecting an assortment of patterns and colors that would coordinate well and bought two of each that I liked.  I ended up with  twelve sheets, which came to under $5 with the sale.

When I got home, I began crafting these paper pinwheels…

Pinwheel closeup

(For an easy Step by Step tutorial on How-To Make Paper Pinwheels, check back on Friday!)
I’ll also show how I hung them on the wall with a really simple technique!

I already had three of these pinwheels left over from Alli’s wedding, so I made six more, giving me plenty to add to my empty wall.  Here’s the finished project:

Pinwheel wall

I love it for a craft room, because it fits the room’s theme!  It’s all about creativity and I think the paper pinwheels say, “This is a place of productivity and imagination!”

I think these pinwheels are adorable and would add a nice touch of whimsy to other places (aside from a craft room), like a nursery or a child’s room.  Like this one:

Girl Heirloom Nursery
I think if you switched out the circles with the pinwheels it would be so cute!

Or for a backdrop wall for a shower or party, like here...

I love how they used different sizes. I may add some smaller ones to my collection!

This wouldn’t be the style for some, but I think it’s adorable!

How about you?  Do you like paper crafty things on the wall, or do you only do professional and sleek?

With love from my crafting room,