Bread · Dinner · Easy recipe

Popovers ~ the Perfect Dinnertime Bread

I don’t know why I never made popovers before; they’re so good and also easy to make!

It was my daughter who said that to me recently, and I’m wondering who else has not made popovers for dinnertime?

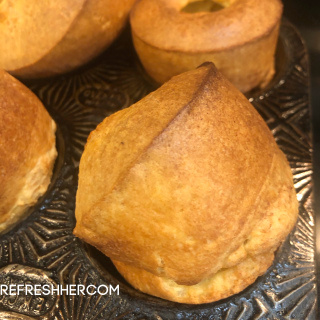
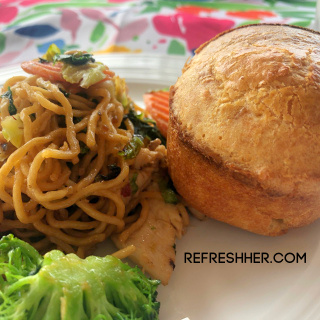
They are whipped up in a matter of about 5 minutes. You simply mix and pour the batter into pans. They are then “POPPED” into the oven where they bake and POP UP in the pan in about 40 minutes. The outsides are crispy and the insides are moist and tender. They’re a great accompaniment to so many different kinds of meals!

Popovers

Ingredients

  • 1 tablespoon shortening or nonstick cooking spray
  • 2 beaten eggs
  • 1 cup milk
  • 1 tablespoon cooking oil
  • 1 cup all-purpose flour
  • ¼ teaspoon salt 

Directions

Instructions Checklist

  • Step 1 Using 1/2 teaspoon shortening for each cup, grease the bottoms and sides of six 6-ounce custard cups or cups of a popover pan. (Or, lightly coat cups with cooking spray.) Place the custard cups on a 15x10x1-inch baking pan; set aside. Note: I use a regular muffin tin and it works great!
  • Step 2 In a medium bowl use a wire whisk or rotary beater to beat eggs, milk, and oil until combined. Add flour and salt; beat until smooth. Don’t overbeat. Just mix until everything is well combined.
  • Step 3 Fill the prepared cups half full with batter. Bake in a 400 degree F oven about 40 minutes or until very firm.
  • Step 4 Immediately after removing from oven, prick each popover to let steam escape. Turn off the oven. For crisper popovers, return popovers to oven for 5 to 10 minutes or until desired crispness is reached. Remove popovers from cups; serve immediately. Makes 6 popovers.

If I have leftovers, I put them into a 400 degree oven to warm them and crisp them back up again. It only takes about 5 – 7 minutes.

Are you one that has never tried popovers? I hope you’ll remedy that this week!

Appetizer · Easy recipe · Fast meal · Fish

Mock Sushi Appetizer

May be an image of food and indoor

It’s crazy how our taste buds “grow up” as we do, isn’t it? I feel like I’ve ventured out a whole lot more in recent years, enjoying more spice than I ever would have tolerated. My husband has definitely branched out in his food choices. He grew up on the basic meat and potatoes diet, and then he married a girl who loves to try new recipes each week! He’s been so accommodating and has willingly tried everything I put on the table.

One area we’ve both grown to appreciate is sushi – him even more so than me. I love the fish – I don’t always love the additions. Knowing his love for sushi, I decided to venture out and try an easy “sushi” kind of appetizer for our Valentine’s dinner. Wow! We both LOVED it!

This recipe is from one of my favorite food blogs – Skinny Taste. She calls this a Spicy California Shrimp Stack. It’s not wrapped in the sushi paper – instead, you pile each ingredient into a measuring cup, pack it in, then flip it over onto the plate. It’s then topped with a drizzle of soy sauce and Sriracha Mayo. If you don’t have Sriracha, don’t worry – I used hot sauce in its place and it was delicious!

May be an image of food and indoor

My stacks aren’t quite as pretty as hers, but my measuring cups aren’t straight sides – they’re sloped, so my are more like “domes” than stacks! It didn’t change the taste, and that’s all that matters!! Here’s the simple recipe and instructions I found on her site:

Spicy California Shrimp Stack – From Skinny Taste

  • 1 1/3 cups cooked brown rice – I usually always make extra and keep it in the freezer. So handy!
  • 2 tablespoons rice vinegar
  • 8 ounces cooked shrimp, peeled and tails removed
  • 1 cup diced cucumber, about 1 small
  • 1 teaspoon chopped fresh chives
  • 1/2 cup mashed avocado, about 1 medium
  • 4 teaspoons sesame seeds
  • 4 teaspoons reduced-sodium soy sauce
  • 4 teaspoons mayonnaise – I used light mayo
  • 1 teaspoon sriracha sauce – I used hot sauce

Directions:

  • Cook rice according to package directions, omitting salt and oil.  When rice is done, add rice vinegar and stir.  Evenly spread rice on a sheet pan to cool.
  • Cut shrimp into 1-inch cubes. In a small bowl, combine cucumber and chives. In another small bowl, combine mayonnaise and sriracha sauce.
  • Using a 1 cup dry measuring cup, layer ¼ cup cucumber, then 2 tablespoon of avocado, then ¼ of the shrimp, and 1/3 cup rice.
  •  Carefully turn the cup upside down to turn the stack out onto a plate, lightly tapping the bottom of the cup if necessary.  Sprinkle with Furikake and drizzle with 1 teaspoon soy sauce and sriracha mayonnaise.
  •  Repeat with remaining ingredients.

This was a great appetizer, but would be a wonderful lunch, too! I’m still dreaming about the way it tasted with that spicy mayo on top. Mmmm. I can’t wait to make it again!

Are you a sushi eater? If you like shrimp cocktail, I think you’ll love this recipe!

What food do you eat today that you wouldn’t have eaten in years past?

Comfort Food · Dinner · Easy recipe · soup

Empty the Freezer Soup

Savory soups that simmer on the stove create two things –

  1. An aroma that’s irresistible
  2. A meal that satisfies both appetites and hearts

Last week I had the blessing of spending time with my parents and helping out during a time of hardship. Fixing meals each day was one responsibility I took on with great delight. A sampling of my menu included things like, Pinto Beans like Cracker Barrel’s, traditional Rump Roast dinner with all the trimmings, Baked Potatoes topped with broccoli cheese sauce – all recipe I’ve made many times.

But then my mom requested I make her recipe for Vegetable Beef Soup. She had this recipe in her head and verbally shared it with me one morning. I realized it would pull together very quickly, and would also use up some of the little bits of this and that in the freezer. Always a good thing, right?

During the fall and winter we eat lots of homemade soups. Some of my favorites are Senate Bean Soup, and Cream of Wild Rice Soup but both of these recipes are a little labor-intensive and take some time to prepare (but so worth it!). I love having a delicious soup recipe that’s a snap to pull together, and my mom’s Vegetable Beef Soup definitely fits the bill! You can use whatever vegetables you like/have on hand. This soup is a great way to use up those little bit of leftovers hiding in the fridge or stored in your freezer!

Here’s her simple recipe…

Vegetable Beef Soup

1/2 lb ground beef
1 onion, diced
4 cups chicken broth
1 large can diced tomatoes
1/3 cup frozen corn
1/3 cup frozen peas
1/3 cup lima beans
1 potato, diced
1 carrot, diced
1 can Bush’s northern beans
1/3 cup barley
1/8 tsp. cayenne pepper
1/2 tsp thyme
1/2 tsp Greek seasoning
A couple dashes Worcestershire sauce
Salt and pepper to taste

In a large stock pot, brown ground beef and onion. Drain any fat. Add the chicken broth and then all the vegetables, spices,seasonings and barley. Simmer over medium-low heat for 30-45 minutes.

I like to serve a soup like this with a crusty bread and a side salad.

Yum! This is a perfect winter meal that will:

  • Wisely use up leftover veggies in your freezer
  • Warm bodies
  • Win the hearts of those that sit at your table!

Open up your freezer, grab those veggies and throw them in a pot for this delicious soup this week!

Refresh your menu with a savory soup!

Comfort Food · Crock Pot · Dinner · Ground turkey · Main dish.

Turkey Meatloaf in the Crock Pot

My husband loves Cracker Barrel’s meatloaf and with good reason – it’s delicious! However, it’s also high in calories. Because we’ve both been trying to eat more healthy, and are avoiding those high cal Cracker Barrel entrees, I looked for a meatloaf recipe using ground Turkey. That was when I came upon this gem – BBQ Glazed Turkey Meatloaf that turned out to be FANTASTIC and also cooked in the crock pot! What? Meatloaf in the crock pot? You talk about easy! This recipe is a winner all the way around!! Take a peek!

BBQ Glazed Meatloaf – Cooked in the Crock Pot!

Clean-up was a cinch! Pull the foil out of the bottom of the crock pot and wipe it out! Ta-da! Friends, this recipe is for you if you’re looking for:

  • Delicious
  • Healthy
  • Easy to make
  • Easy to clean up

A friend of mine told me she steers away from ground poultry because it just doesn’t seem right! Well, I understand, but you need to give it a try! It’s so good, and so much better for you! Now for the recipe!

BBQ Glazed Turkey Meatloaf

1 1/4 pound ground turkey
1/2 cup plain breadcrumbs
1/4 Cup shredded Mexican style shredded cheese
1/4 cup minced onion
1 large egg, beaten
1 tsp Dried oregano
1/4 tsp salt
1/4 tsp pepper
2 Tbl ketchup
2 tsp light brown sugar
2 tsp Worcestershire sauce
1 tsp spicy brown mustard (I used Dijon)

1. Fold a 24-inch length of foil in half lengthwise. Fit into the bottom and up the sides of a 5-6 quart slow-cooker.

2. Put the turkey, bread crumbs, cheese, onion, egg, oregano, salt, and pepper in a medium bowl; mix with hands until well combined. Shape the mixture into a loaf and place on the foil in the slow cooker.

3. Cover the slow cooker and cook until the meatloaf juices run clear or an instant read thermometer inserted in the center of the meatloaf registers 165°F, 3–4 hours on high or 6–8 hours on low.

4. Combine the ketchup, sugar, Worcestershire sauce, and mustard in a small bowl. Spoon the mixture over the meatloaf, spreading it smooth. Cover the slow cooker and cook until the glaze is heated through, about 30 minutes longer. With the help of the foil, lift the meatloaf from the slow cooker and transfer to a platter. Discard foil and cut the meatloaf into 6 slices. Yields 1 slice meatloaf per serving.

This meal was absolutely delicious! My husband isn’t pining away for his Cracker Barrel meatloaf anymore!

I made this meal for our Sunday dinner and it was so great that it was ready when we got home from church! I mixed up the meatloaf the night before, then popped it into the crock pot before we headed out the door. What a great meal when you need something savory and have time to let the crock pot do the work!

Do you eat ground poultry? If not, I really hope you’ll get some turkey and try this recipe! I believe it will convert you!

Here are a couple other turkey recipes we love.

With love from my country kitchen,

Cookies · Easy recipe · Gluten-Free

Easiest Ever Four-Ingredient Peanut Butter Cookies

I’ve been making these simple Peanut Butter cookies for years, because:
1) They only require four ingredients
2) They taste like the “regular” Peanut Butter Cookie recipe
3) They’re all ingredients I almost ALWAYS have on hand. That means I know I can always whip up a batch if I need a fast, easy treat.

I recently made these into bite-sized treats so I could have a taste of dessert with only 33 calories, but you could make them any size you’d like! You could also add mini chocolate chips or peanuts for some variety.

My mini size look like little buttons! So cute and so yummy!

Easiest Ever Peanut Butter Cookies

1 Cup Peanut butter, smooth or crunchy
3/4 Cup Brown Sugar
1 egg
1/2 teaspoon baking soda

Mix all ingredients in a large bowl until creamed together. For small cookies, place one teaspoon batter onto parchment paper-lined baking sheets.
If you want the identifiable crisscross pattern, dip a fork in granulated sugar and press lightly in each direction.
Bake at 350 degrees for 6-8 minutes or until lightly browned. Cool on baking sheet 10 minutes, then place on cooling rack to cool completely.
Yield: 60 mini cookies

I popped them into a Ziplock bag and put them in the freezer. When I’m ready for a treat, I put one in the microwave for 30 seconds.

Add a glass of milk to these treats and you have a delicious snack or dessert!

Is this old recipe in your files? If not, I hope you’ll give them a try! They’re as delicious as they are simple!