baking · cakes · dessert · hospitality · Make-Ahead

(L)Oven Monday – A Healthy, Yummy Dessert

Angel Food.jpg

Cooking Light has great recipes for Angel Food Cakes.  These cakes have no fat, making them a healthier dessert than most.  The nice thing about baking your own Angel Food cake is:

  1. They taste better
  2. You can add flavorings
  3. They cost pennies
  4. You can make it ahead of time and freeze it

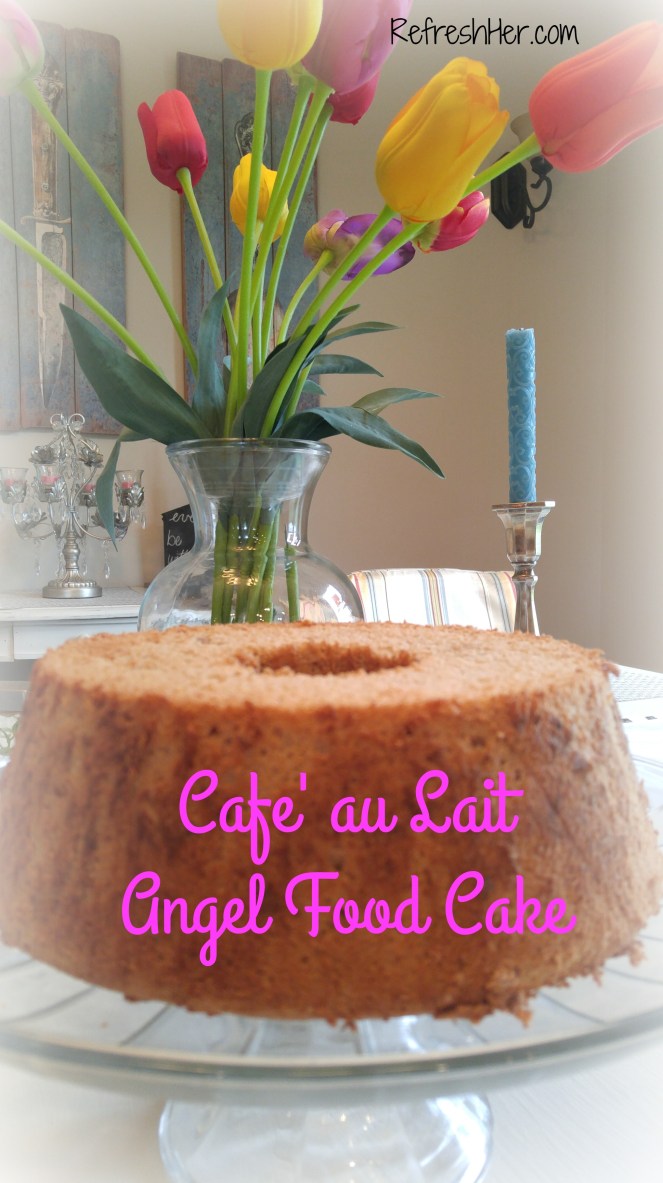
This recipe  – Cafe’ au Lait Angel food has a coffee flavor and we love that!  Cafe’ au Lait means coffee with milk.  This recipe also has a custard-like sauce to serve with it,which gives the coffee flavor it’s “milk addition.  It takes regular old Angel Food to the next level, and certainly makes it company worthy!  Here’s the recipe:

Cafe’ au Lait Angel Food Cake

Ingredients

  • Cake:
  • 1 cup sifted cake flour – Don’t have any?  Try this – Take one level cup of AP flour, remove two tablespoons, and then add two tablespoons of cornstarch back in. Be sure to sift the flour to distribute the cornstarch well before using it in your cake batter.
  • 1 1/2 cups sugar, divided
  • 1/4 teaspoon ground cinnamon
  • 2 tablespoons instant espresso granules or 2 tablespoons instant coffee granules
  • 2 tablespoons hot water
  • 12 large egg whites
  • 1 teaspoon cream of tartar
  • 1/4 teaspoon salt
  • 1 1/2 teaspoons vanilla extract
  • Sauce:
  • 3 large egg yolks, lightly beaten
  • 1/2 cup sugar
  • 1 tablespoon cornstarch
  • 1/8 teaspoon salt
  • 3 cups 2% reduced-fat milk, divided
  • 1 vanilla bean, split lengthwise
  • 3 tablespoons Frangelico (hazelnut-flavored liqueur) –  I didn’t use this or substitute
  • Remaining ingredient:
  • 1/2 cup chopped hazelnuts, toasted
  1. Preheat oven to 350°.

  2. To prepare cake, lightly spoon flour into a dry measuring cup; level with a knife. Combine flour, 3/4 cup sugar, and cinnamon, stirring with a whisk, and set aside. Combine espresso and hot water, stirring until espresso dissolves; set aside.

  3. Place egg whites in a large bowl; beat with a mixer at high speed until foamy. Add cream of tartar and 1/4 teaspoon salt; beat until soft peaks form. Add 3/4 cup sugar, 2 tablespoons at a time, beating until stiff peaks form.

  4. Beat in espresso mixture and vanilla extract. Sift 1/4 cup flour mixture over egg white mixture; fold in. Repeat procedure with remaining flour mixture, 1/4 cup at a time.

  5. Spoon batter into an ungreased 10-inch tube pan, spreading evenly. Break air pockets by cutting through batter with a knife. Bake at 350° for 50 minutes or until cake springs back when lightly touched. Invert pan; cool completely. Loosen cake from sides of pan using a narrow metal spatula. Invert cake onto plate.

    I had to work just  a little to loosen my cake from the pan, but it did come out whole after a few little “tugs” with my metal spatula.

    I saw that eggs are on sale at Kroger this week for .79, so it’s a good time to make one of these cakes!  I’m going to attempt to upload a video  this Wednesday of how to make this cake.  You can see just how simple it really is!  It’s really fun to venture out a little a make something a little challenging.  I hope you’ll give this a try!  Plus it’s just fun to say – Cafe’ au Lait!

    Happy baking!

    With love from my country kitchen,

    Denise Signature 150 px

    baking · dessert · Dinner · entertaining · main · Side dish

    Easy Entertaining Menu

    coffee-pie-1

    Entertaining at any season can be overwhelming, but especially so at Christmas, right?  I came up with an entertaining menu that can be made completely ahead of time and simply warmed up when ready to serve.  This is a Mexican Food feast that is delicious and stress-free!  Talk about simplifying things – this will do just that when you invite folks over!

    Spiced Pork Tenderloin with Avocado Salsa

    Spanish Rice

    Refried Beans

    Coffee Pie

    spiced-pork

    Spiced Pork Tenderloin Tacos

    • 1 pork tenderloin (about 4 pounds)
    • 2 teaspoons smoked paprika
    • 2 teaspoons ground cumin
    • 1 teaspoon garlic powder
    • 1 teaspoon dried oregano
    • 1/2 teaspoon cinnamon
    • 2 tablespoons extra-virgin olive

    Preheat the oven to 375°. Set the tenderloin on a large rimmed baking sheet. In a small bowl, mix the smoked paprika with the cumin, garlic powder, oregano and cinnamon. Rub the pork with the olive oil and season with salt and pepper. Sprinkle the spice mixture all over the pork. Roast the tenderloin until an instant-read thermometer inserted into the centers registers 145°. Transfer the tenderloins to a cutting board and let rest for 10 minutes. Using two forks, shred the tenderloin for tacos.

    Salsa Ingredients

    • 1/2 small red onion, cut into 1/4-inch dice
    • 2 tablespoons red wine vinegar
    • 1 medium tomato, cut into 1/2-inch dice
    • 1 Hass avocado, cut into 1/2-inch dice
    • 1 teaspoon minced chipotle in adobo
    • 1/2 teaspoon chopped fresh oregano
    • 3 tablespoons extra-virgin olive oil
    • Kosher salt
    • Freshly ground pepper
    • Warm tortillas, for serving

    For Salsa:

    In a medium bowl, mix the onion with the red wine vinegar and let stand for 10 minutes. Add the tomato, avocado, chipotle, oregano and olive oil, season with salt and pepper and toss gently. Fill warm tortillas with the sliced pork, top with the salsa and serve.

    spanishrice

    The Spanish Rice is every bit as easy as a boxed brand but even tastier!  You may already have every ingredient in your pantry for this recipe!

    Spanish Rice

    Directions:

    1. Heat oil in a large, heavy skillet over medium heat. Stir in onion, and cook until tender, about 5 minutes.
    2. Mix rice into skillet, stirring often. When rice begins to brown, stir in chicken broth and salsa. Reduce heat, cover and simmer 20 minutes, until liquid has been absorbed.

    refried-beans

    Refried beans are not the most beautiful dish to photograph, but when they’re made from scratch, they are a beautiful thing! This recipe is so delicious.  Here’s how I made mine using the crock pot to simplify the recipe:

    Refried Beans
    (I halved the recipe and it made plenty for 6-8)

    6 cups dried pinto beans
    4 slices thick-cut bacon, cut into 1-inch slices (or you can use salt pork, ham hock or diced ham instead)
    1 tablespoon chili powder
    1 teaspoon salt, plus more if needed
    2 teaspoons black pepper, plus more if needed
    1/2 stick butter
    1 onion, diced
    2 cups grated sharp Cheddar
    Sliced jarred jalapenos

    Put beans in a pot of water and let sit overnight.  In the morning, cook beans at medium-high temp until boiling.  Add 2 tsp baking soda.  Cook for 2 minutes. (This releases the gases in the beans and will keep tummies from feeling like they’ve eaten beans!)  Drain off water, rinse and place beans and bacon in a crock pot with enough water to cover.  Cover and cook on high for 3 hours.  Simmer butter and cook onion until tender.  Add the beans and liquid into a cast iron skillet, along with seasonings.  Cook until the sauce thickens and beans are tender.  Mash with potato masher until some beans still remain whole.  Serve with Cheddar cheese and Jalapenos.

    1212161253.jpg

    Coffee Pie

    1 Cup Water
    1 tlb instant coffee granules
    30 Large marshmallows
    1/2 Cup walnuts
    1 cup Whipping Cream
    Cool Whip
    Chopped Coffee Beans or Mini Chocolate Chips
    Baked pie Shell

    Bake Pie shell.  Let cool.
    In a medium sauce pan, boil water.  Add coffee granules and marshmallows, stirring constantly until melted.  Let cool completely.

    Whip the whipping cream.  Fold into cooled coffee mixture.  Pour into bake pie shell.  Cover and refrigerate 8 hours or overnight.

    Cover with Cool Whip and Coffee beans or Chocolate chips.  Serve (with coffee!)

    Take the stress out of entertaining and make a menu like this one that can all be prepared ahead of time!  My guests enjoyed it, and if you invite people that love Mexican food, they’ll be really glad you invited them over!

    Happy entertaining!

    Denise Signature 150 px


    Christmas · dessert · home · refreshment at home

    Simplifying Christmas Prep in the Kitchen

    christmas-kitchen-1

    The kitchen is a busy place in most homes during Christmas. In order to keep it fun and not a drudgery, I’ve come up with six ways to simplify your work, so you can still be (L)oven your kitchen by the time December 25th arrives!

    1. Get dinner in the crock pot first thing in the morning  on a day when you know you’re going to be doing a marathon baking event.   That way you won’t have to stop your progress to fix a meal.  It will also keep your oven free for those cookies!
    2. Get any cookie dough that has to be refrigerated into the fridge on one day, and then bake the cookies the next day.  If you do all the mixing on one day and the rolling and baking on the next you won’t be as worn out!
    3. When you have a few extra minutes, fill a Ziploc bag with the dry ingredients for the cookies, sweet breads, or muffins you’re going to bake in the near future.   Label the bag.  Then on the day when you mix up the dough, you’ll simply have to pour and stir!  You’ve created your own baking mix!!
    4. Keep hot, soapy water in the kitchen sink.  As you work, put your baking utensils in the water.  Wash them up when the dough is complete, or the cookies are in the oven.  The kitchen will be clean when you’re finished and you can turn off the light and go take a hot bath!
    5. Enlist in help!  If you have children, let them put the sprinkles on, crush the candy canes, or chop the nuts (with a hand chopper).
      You could also invite some friends (or your grown daughters/daughters-in-law) over and have each one bring the ingredients for a cookie recipe.  Work together on one recipe at a time.  You won’t believe how fast the work goes!  Divide the spoil between each of you when you’re finished.
    6. Make some treats that require NO BAKING – (like these Chocolate Peanut butter stacks that we LOOOOVE.  Recipe below)
      There are many other No-Bake options –

      1. Peppermint Bark Oreos
      2. Graham Cracker Houses
      3. Santa Hat Cheesecake Bites

    If you haven’t had these and you’re a chocolate and peanut butter fan, trust me when I say that you need these in your life!!

    1204160803a.jpg

    Chocolate Peanut Butter Stacks

    Ingredients:
    Ritz crackers
    Peanut butter
    Chocolate bark

    Instructions:
    Spread crackers with peanut butter, top with another cracker.  Dip crackers into melted chocolate bark.I melt my chocolate in the microwave, stirring every 30 seconds until completely melted.  Set cookies on waxed paper until chocolate hardens.

    By simplifying things in the kitchen, you’re also staying refreshed during a busy time of the year!

    Happy baking,

    Denise Signature 150 px

    baking · Bread · breakfast · Cooking · dessert · Gifts

    (L)Oven Monday – The Best Food Gifts from Your Kitchen

    As I make my preparations for a more “simple” Christmas this year, I’m reminded that giving gifts from what you love is the best kind of gift to share.  If I do what I love – I bake and the receiver knows that it was prepared especially for them with lots of (L)oven from my oven!

    I have many recipes on my blog that I have given away, and I’m going to compile a short list of some of my favorites for you today.  These are simple to make and are LOVED by those that receive them.  Let’s get shopping/baking…

    1. Nutty Orange Coffee Cake – – This is a fancier form of Monkey Bread.  It’s made from canned biscuits, cream cheese and cinnamon and sugar.  It’s pretty, it’s easy to make and is so good it became a Christmas tradition for our breakfast!Nutty orange Coffee cake.jpg
    2. Cranberry Crumble – Another great coffee cake that anyone would LOVE to receive!
      cranberry-coffee-cake
    3. French Bread Loaves – A good old crusty bread tied up in a linen kitchen towel is as lovely as it is delicious!
      French Bread 1.jpg
    4. Homemade Granola – Gifted in a jar with a pretty ribbon, this granola is perfect for any breakfast lover!
      Granola.jpg
    5. Cream Cheese Coffee Cakes – These are more like Danishes and who doesn’t love a Cream Cheese Danish????  This recipe makes four, so it really makes great use of your time in the kitchen!
      danish 1.jpg
    6. Deep Dish Hershey Brownies – This is my family’s favorite brownie recipe and I’ve made them for years.  Any chocolate lover will be delighted to receive a plate of these!
      Deep dish brownies.jpg
    7. Microwave Caramel Popcorn – This is the easiest caramel popcorn!  It makes a nice pile of popcorn for the snacker on your list!

    caramel corn.jpg

    You can also go here for a list of some fabulous cookies to bake up and place in cellophane bags or pretty Christmas tins.

    Food is a wonderful gift of love from your oven to the recipient.  Get baking and finish your gift list!

    Which of these recipes will you make and give away?

    With love from my country kitchen,

    Denise Signature 150 px

    baking · dessert · entertaining · Make-Ahead

    (L)Oven Monday – Cutie Pies!

    Okay, so the title for these recipe Monday’s came into my head last week when I was writing my  husband a note about his breakfast being in the (L)oven! You do get it, right, or is it just my crazy mind?  I love to bake and cook, so I thought an appropriate title would be “(L)Oven Monday”  =)  My mind works words over like that.  You can vote yes or no at the end of this post!

    Anyway, while I was in the kitchen last week getting ready for my Apples of Gold ladies to come, I came across the adorable idea of baking pies in Mason Jar lids. How genius is that?

    mason jar pie.jpg

    They make individual pies that are so stinking cute!  It’s the perfect size and they are so easy to put together.  It’s much less intimidating to  make a three-inch crust than an eight or ten inch one!  You could make any number of fillings, of course.  I made apple and Kentucky Derby pies with mine.

    Here’s the Derby pie getting ready for the oven.  How good does this look…

    mason-pies

    Here’s the baked pie…

    pie-bite

    The Mason jar lids make a little spring form pan!  After they’re baked, you simply push up on the bottom of the lid and they pop right out.  Like I said – GENIUS!

    Here’s a picture tutorial on how I made them:

    My Pampered Chef Crimper is a little larger than the lid, which is what you want.  Find a bowl or glass that’s about a half inch bigger than the lids and cut circles in your crust.  I made mine, but you could also purchase dough.

    pie-collage

    I sprayed the lids with cooking spray to ensure they’d pop out easily.  Don’t over-fill the pie – two or three tablespoons of filling will do, especially if you top it with crumb topping or dough.  I also sprinkle sugar over the crust to make it pretty and delicious!

    These would be great for Thanksgiving!  No need to slice pie!  Everyone can help themselves to their own individual pie.  Pumpkin, apple, peach – whatever kind you want – just portion the filling into the crusts.

    I made up extras and put them in the freezer.  All I have to do is take it out and bake it when I need a dessert.  I also freeze my large pie crusts in Ziploc bags.

    mason-pies-1

    I cover the crust with Syran wrap, then put it into the freezer bags.

    I hope you’ll make up a whole bunch of these Cutie Pies for your Thanksgiving dinner.  I think everyone will be talking about them and copying your idea!!!  Bake up a cute little treat from your (L)oven!

    What do you think…do you like”(L)Oven Monday” for these Monday posts?  Or is it like, Huh???????????????????????

    With love from my country kitchen,

    Denise Signature 150 px